How to share Excel file for multiple users and co-author a shared workbook
How to share an Excel file
This section shows how to share an Excel workbook for multiple users by saving it to a local network location where other people can access it and make edits. You can keep track of those changes and accept or reject them.
With the workbook open, perform the following steps to share it:
- On the Review tab, in the Changes group, click the Share Workbook button.
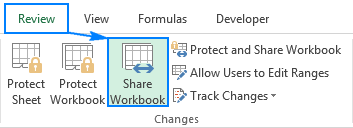
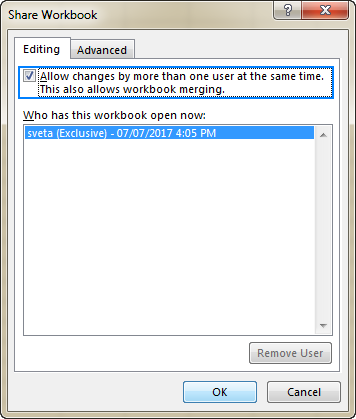
- The Share Workbook dialog box will appear, and you select the Allow changes by more than one user at the same time. This also allows workbook merging check box on the Editing tab.
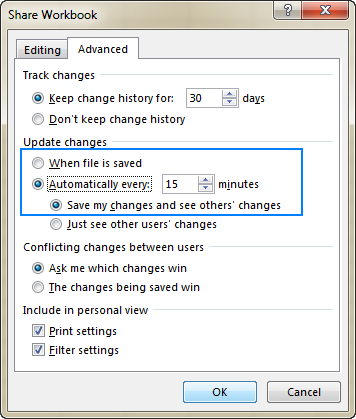
- Optionally, switch to the Advanced tab, select the desired settings for tracking changes, and click OK.
For example, you may want to have changes updated automatically every n number of minutes (all the other settings on the screenshot below are the default ones).
- Save you Excel file to a network location where other people can access it (the fastest way is by using the Ctrl + S shortcut).
If done correctly, the word [Shared] will appear to the right of the workbook's name as shown in the screenshot below:

Now, you and your colleagues can work on the same Excel file at the same time. You are free to accept or reject their changes, and after the desired changes have been incorporated, you can stop sharing the workbook. Further on in this tutorial, you will find the details on how to do all this.
Note. If Microsoft Excel refuses to share a certain workbook, most likely it's because of one of the following reasons:
- Workbooks that have tables or XML maps cannot be shared. So, be sure to convert your tables to ranges and remove the XML maps before sharing your Excel file.
- To be able to share a workbook, some privacy settings need to be disabled. Go to File > Excel Options > Trust Center, click the Trust Center Settings… button, and under the Privacy Options category, uncheck the Remove personal information from file properties on save box.
This section shows how to share an Excel workbook for multiple users by saving it to a local network location where other people can access it and make edits. You can keep track of those changes and accept or reject them.
With the workbook open, perform the following steps to share it:
- On the Review tab, in the Changes group, click the Share Workbook button.

- The Share Workbook dialog box will appear, and you select the Allow changes by more than one user at the same time. This also allows workbook merging check box on the Editing tab.

- Optionally, switch to the Advanced tab, select the desired settings for tracking changes, and click OK.
For example, you may want to have changes updated automatically every n number of minutes (all the other settings on the screenshot below are the default ones).
- Save you Excel file to a network location where other people can access it (the fastest way is by using the Ctrl + S shortcut).

If done correctly, the word [Shared] will appear to the right of the workbook's name as shown in the screenshot below:

Now, you and your colleagues can work on the same Excel file at the same time. You are free to accept or reject their changes, and after the desired changes have been incorporated, you can stop sharing the workbook. Further on in this tutorial, you will find the details on how to do all this.
- Workbooks that have tables or XML maps cannot be shared. So, be sure to convert your tables to ranges and remove the XML maps before sharing your Excel file.
- To be able to share a workbook, some privacy settings need to be disabled. Go to File > Excel Options > Trust Center, click the Trust Center Settings… button, and under the Privacy Options category, uncheck the Remove personal information from file properties on save box.
How to share Excel workbook and protect change tracking
If you'd like not only to share an Excel file, but also to ensure that no one turns off the change history or removes the workbook from shared use, proceed in this way:
- On the Review tab, in the Changes group, click the Protect and Share Workbook button.
- The Protect Shared Workbook dialog window will show up, and you select the Sharing with track changes check box.
- Type a password in the Password (Optional) box, click OK, and then retype the password to confirm it.
Though entering a password is optional, you'd better do it. Otherwise, there's little sense in using this option, because anyone would be able to remove the protection and thus stop the workbook sharing.
- Save the workbook.
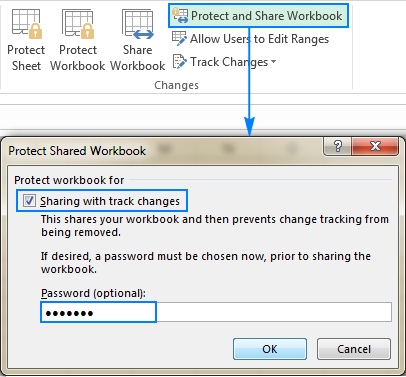
Clicking OK in the above dialog box will change the Protect and Share Workbook button on the ribbon to Unprotect Shared Workbook, and clicking this button will both remove the protection from the shared workbook and stop sharing it.
Note. If the workbook is already shared, and you want to protect sharing with a password, you must unshare the workbook first.
Protect worksheet vs. protect shared workbook
The Protect and Share Workbook option only prevents turning off change tracking in a shared workbook, but does not prevent other users from editing or deleting the workbook's contents.
If you want to prevent people from changing important information in your Excel document, you will need to lock some areas before sharing it ("before" is an important word here since the worksheet protection cannot be applied to an Excel shared workbook.)
Excel shared workbook limitations
When deciding to share your Excel file, please be aware that it may cause some troubles to your users because not all features are fully supported in shared workbooks. Here are some of the limitations:
|
|
In fact, you will be able to use the existing features, but you won't be able to add or change them. So, if you'd like to benefit from any of the above options, be sure to apply them before sharing your Excel file. The complete list of features unsupported in shared workbooks can be found on Microsoft's web-site.
How to edit an Excel shared workbook
After you open a shared workbook, you can enter new or change existing data in a regular way.
You can also identify your work in a shared workbook:
- Click the File tab > Options.
- In the General category, scroll down to the Personalize your copy of Office section.
- In the User Name box, enter the user name that you want to display, and click OK.
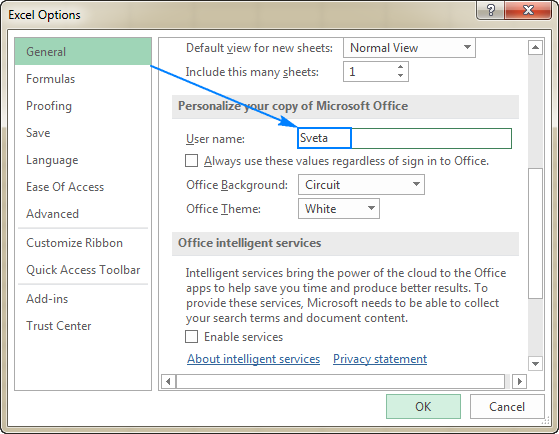
Now, you can input and edit data as usual, keeping in mind the following limitations of shared workbooks.
How to resolve conflicting changes in a shared Excel file
When two or more users are editing the same workbook simultaneously, some edits can affect the same cell(s). In such situations, Excel keeps the changes of the user who saves the workbook first. When another user tries to save the workbook, Excel displays the Resolve Conflicts dialog box with the details about each conflicting change:
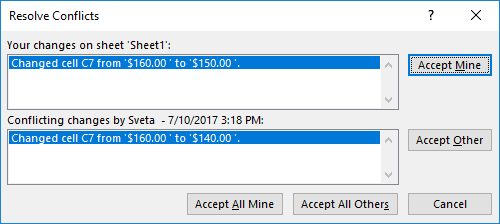
To resolve conflicting changes, do one of the following:
- To keep your change, click Accept Mine.
- To keep the other user's change, click Accept Other.
- To keep all of your changes, click Accept All Mine.
- To keep all of the other user's changes, click Accept All Others.
Tip. To save a copy of the shared workbook with all your changes, click the Cancel button in the Resolve Conflicts dialog box, and then save the workbook under a different name (File > Save As). You will be able to merge your changes at a later point.
How to force recent changes to override previous changes automatically
To have the most recent changes automatically override any previous changes (made by you or by other users), without displaying the Resolve Conflicts dialog box, do the following:
- On the Review tab, in the Changes group, click Share Workbook.
- Switch to the Advanced tab, select The changes being saved win under Conflicting changes between users, and click OK.
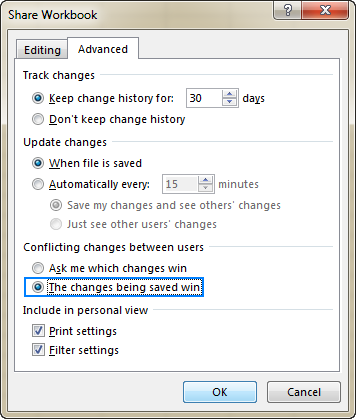
To view all the changes that have been made to the shared workbook, use the Track Changes feature on the Review tab, in the Changes group. It will show you when a particular change was made, who made it, and what data was changed.
How to merge different copies of a shared workbook
In some situations, it can be more convenient to save several copies of a shared workbook, and then merge changes made by different users. Here's how:
- Share your Excel file to a local network location.
- Other users can now open the shared file and work with it, each person saving their own copy of the shared workbook to the same folder, but using a different file name.
- Add the Compare and Merge Workbooks feature to your Quick Access toolbar. The detailed steps on how to do this can be found here.
- Open the primary version the shared workbook.
- Click the Compare and Merge Workbooks command on the Quick Access toolbar.

- In the Select Files to Merge dialog box, select all the copies you want to merge (to select several files, hold the Shift key while clicking the file names, and then click OK).
Done! The changes by different users are merged into a single workbook. Now you can highlight the changes, so you can view all the edits at a glance.
How to remove users from a shared Excel workbook
Sharing an Excel file for multiple users can result in many conflicting changes. To avoid this, you may want to disconnect certain people from the shared workbook.
To remove a user from a shared workbook, do the following:
- On the Review tab, in the Changes group, click the Share Workbook button.
- On the Editing tab, select the name of the user you want to disconnect, and click the Remove User button.
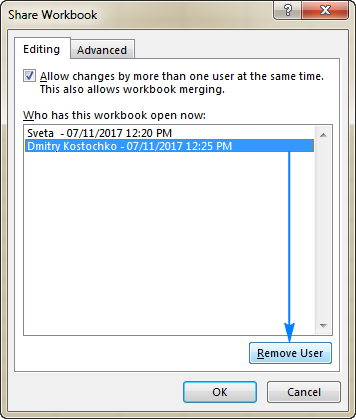
Note. This action disconnects users only for the current session, but does not prevent them from reopening and editing the shared Excel file again.
If the selected user is currently editing the shared workbook, Microsoft Excel will warn you that any unsaved changes of that user will be lost. You click OK to continue or Cancel to abort the operation and allow the user to save their work.
If it is you that have been disconnected, you can preserve your work by saving the shared workbook with a different name, then reopen the original shared workbook and merge your changes from the copy you've saved.
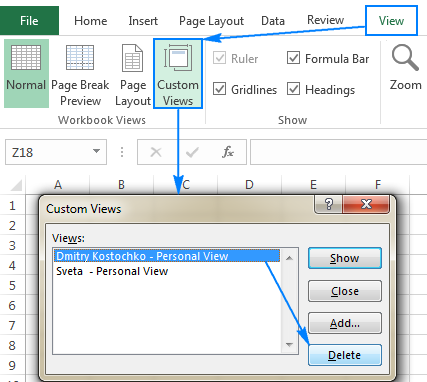
If you want to delete personal views of the removed user, switch to the View tab > Workbook Views group, and click Custom Views. In the Custom Views dialog box, select the views you want to remove, and click Delete.
How to unshare an Excel file
When the teamwork has been completed, you can stop sharing the workbook in this way:
Open the Share Workbook dialog box (Review tab > Changes group). On the Editing tab, clear the Allow changes by more than one user at the same time… check box, and click OK.
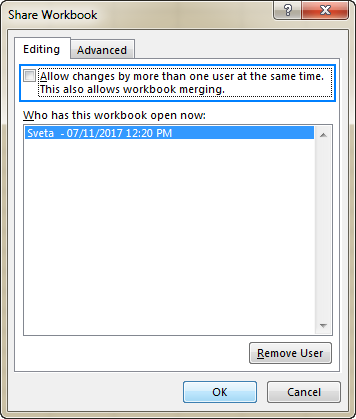
Excel will displays an alert that you are about to remove the file from shared use and erase the change History. If that's what you want, click Yes, otherwise No.
- Before clearing this box, make sure you are the only person listed under Who has this workbook open now. If there are other users, disconnect them first.
- If the box is uncheckable (grayed out), most likely shared workbook protection is on. To unprotect the workbook, click OK to close the Share Workbook dialog box, and then click the Unprotect Shared Workbook button on the Review tab, in the Changes group.
How to share Excel workbook using OneDrive
Another way to share an Excel workbook is to save it to OneDrive, invite your colleagues to work on it, and see each other's changes instantaneously. Microsoft calls it co-authoring.
Another way to share an Excel workbook is to save it to OneDrive, invite your colleagues to work on it, and see each other's changes instantaneously. Microsoft calls it co-authoring.
Save and share a workbook
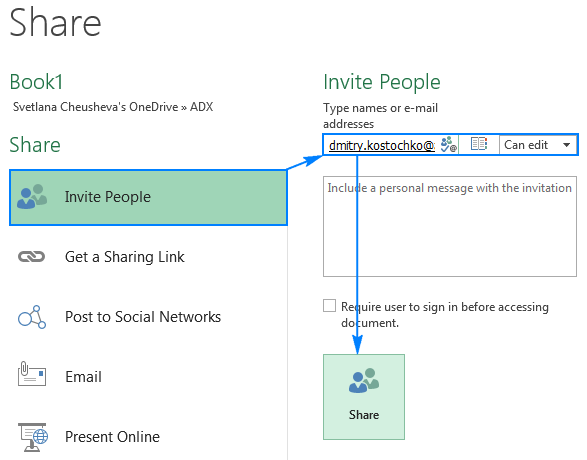
In Excel 2013 and Excel 2010, to save a workbook to OneDrive, perform these steps:
- Click File > Share > Save to Cloud.
- Invite people to collaborate on the workbook by typing their names or email addresses in the corresponding box.
- Make sure Can edit is selected in the dropdown list on the right (default) and click Share.
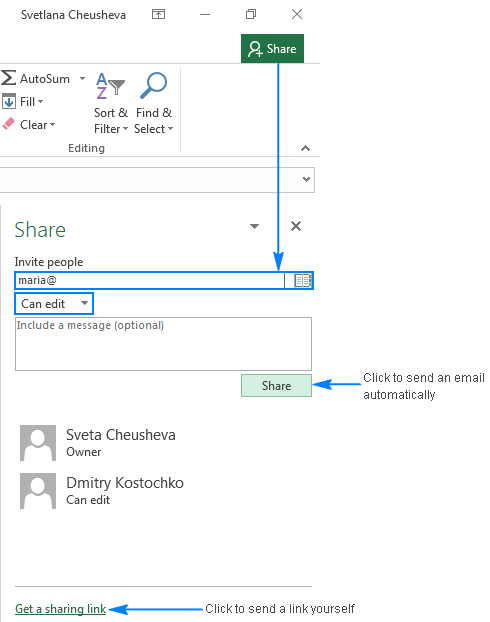
In Excel 2016, you can simply click the Share button in the upper-right corner, save the workbook to a cloud location (OneDrive, OneDrive for Business, or SharePoint Online library), type email addresses in the Invite people box, separating each with a semicolon, and then click the Share button on the pane (please see the screenshot below).
Clicking the Share button will send an email message to each person, a copy will be sent to you too, just in case. If you'd rather send the link yourself, click Get a sharing link at the bottom of the pane instead.
In Excel 2013 and Excel 2010, to save a workbook to OneDrive, perform these steps:
- Click File > Share > Save to Cloud.
- Invite people to collaborate on the workbook by typing their names or email addresses in the corresponding box.
- Make sure Can edit is selected in the dropdown list on the right (default) and click Share.

In Excel 2016, you can simply click the Share button in the upper-right corner, save the workbook to a cloud location (OneDrive, OneDrive for Business, or SharePoint Online library), type email addresses in the Invite people box, separating each with a semicolon, and then click the Share button on the pane (please see the screenshot below).
Clicking the Share button will send an email message to each person, a copy will be sent to you too, just in case. If you'd rather send the link yourself, click Get a sharing link at the bottom of the pane instead.

Co-author with other people
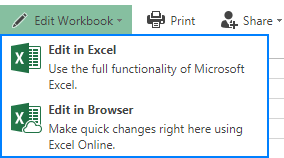
When your colleagues receive an invitation, they simply click the link to open the workbook in Excel Online, and then click Edit Workbook > Edit in Browser to edit the file.
Excel 2016 for Office 365 subscribers (as well as users of Excel Mobile, Excel for iOS and Excel for Android) can co-author in their Excel desktop application by clicking Edit Workbook > Edit in Excel.
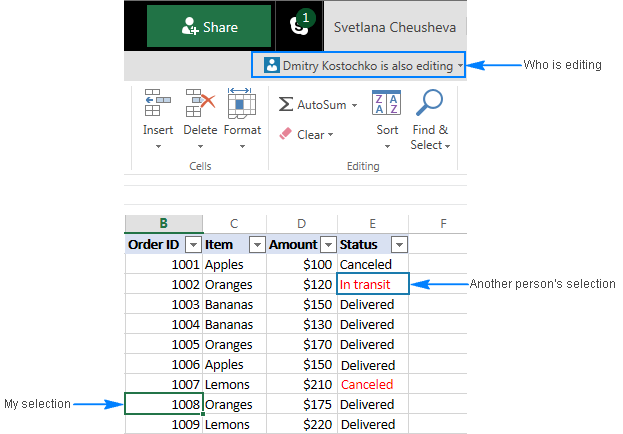
Now, as soon as other people start editing the workbook, their names will appear in the upper-right corner (sometimes pictures, initials, or even "G" that stands for guest). You can see other users' selections in different colors, your own selection is traditionally green:
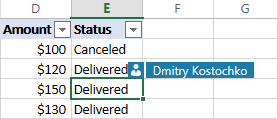
If multiple users are co-authoring, and you lose track of who is editing a specific cell, click on that cell, and the person's name will be revealed.
To jump to the cell being edited by someone, click their name or picture, and then click the green box with the cell address.
