How to Add a Shared Mailbox in Outlook Client
If you have worked with Microsoft 365, then you might be familiar with shared mailboxes, which are used by a group of people or employees to receive and send email from a common email address. Multiple users can access a shared mailbox if the administrator gives them access to it.
Using a shared mailbox in Microsoft 365 is pretty straightforward, but when it comes to adding and using a shared mailbox in Outlook, most people don’t understand it. So, in this article, we will discuss how you can add and use a shared mailbox in Outlook.
Before adding and using a shared mailbox in MS Outlook 2013, 2016, or 2019, make sure you have taken care of the following points:
- The shared mailbox should be set up and available in Microsoft 365
- MS Outlook should be configured with your Microsoft 365 account
- The administrator has given you access to the shared mailbox
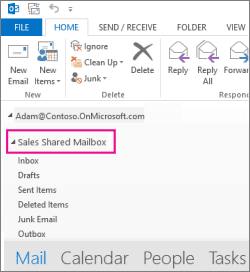
Once the admin adds you to the shared mailbox in Microsoft 365, you need to close and restart MS Outlook. After restarting the Outlook, the shared mailbox might appear in your folder pane below the primary mailbox. However, if this doesn’t happen, then you can add the shared mailbox manually.
Adding Shared Mailbox to Outlook
Shared mailboxes take some time to display in the Outlook folder pane. However, if it doesn’t work for you, then you can add it manually by following the below steps:
- Start MS Outlook and go to the File tab.
- Click Account Settings, and then select Account Settings from the menu.
- Now, click the Email tab, and ensure that the right account is highlighted.
- In the Email tab, click Change at the bottom.
- A new tab will appear on the screen, click More Settings>Advanced>Add.
- Now, provide the shared email address to which the admin has added you, and then click Ok.
- After that, click Next>Finish>Close.
The shared mailbox will now appear in your MS Outlook below the primary mailboxes.

Using a Shared Mailbox in MS Outlook
After adding the shared mailbox to your Outlook, you can use it to send or receive emails. Let’s have a look at how to send emails from Shared Mailbox in Outlook.
- Open MS Outlook and click New Email above the folder list. A new message window will appear on the screen.
- Click the ‘…’ icon at the top of the message, and then select Show From.

Note: The ‘Show From’ option shows that the receivers will receive the email from a shared mailbox address. - If you’re using the shared mailbox for the first time, then you will have to add the email address in the From section drop-down list:
- Right-click on the ‘From’ option and click Remove.

- Enter the shared mailbox address, so the next time you send an email from the shared mailbox, it will appear as an option in the ‘From’ drop-down menu.
- Right-click on the ‘From’ option and click Remove.
- Now, to add recipients, type the email or name of the person who is in your contact list or organization’s address list.
- Enter the subject related to the email, and then type the message that you want to send.
- After typing the message, click Send.
The email will be sent from the Shared Mailbox address.
Using the Shared Mailbox Calendar
A shared mailbox calendar is shared with the members of the shared mailbox. As a member, you can create, edit, and delete events in the Calendar. However, if you don’t have access to the shared mailbox calendar, then you can access it easily with the following steps. The steps are given for Outlook on the web.
- Use Outlook on the web to sign in to your account and then select Calendar.
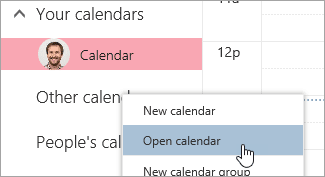
- From the Calendar menu, right-click on the Other Calendar option and select Open Calendar.

- In the ‘From Directory’ look for the shared Calendar that you want to open, and then select the Shared mailbox that is linked with the Calendar, and then click Open.
- The Shared Calendar will appear in your Calendar list.
